Sunday, 26 June 2016

How to compare images using C#

Introduction

Have you ever wondered how we can compare images according to their content? That is, given an image, how to find images similar to it. You may have seen this functionality implemented by Google. Just visit https://images.google.com/, enter an input image (either by uploading it or by linking to it) and click "Search by image":


Google searches the web and displays a list of similar images. In fact, this search for similar images is a subject of scientific research since early 2000s. It is called Content Based Image Retrieval or shortly CBIR. If you search for CBIR on the Internet, you will find numerous papers for it.

So, how do we compare images?

You may ask yourself: "Why do i need such a system?. If i want to search for an image, i use the keyword search". Yes, but there are occasions where search by keyword is meaningless. One such occasion is crime investigation. In this case, I have an image (fingerprint) and I want to match it against other images (fingerprints) from a large database. There are also other fields where this "pattern matching" is essential.

Next question is: "How do i compare images?". The majority of scientific papers propose methods of comparing images. And "what are the main requirements for such a method?":

  • Accuracy
  • Speed
I want my method (or algorithm) to be both accurate and fast, and this is not always easy. Basically, all methods try to extract a short description of an image. Let's say that we have a car picture. The ideal method should recognize the car object and describe the picture with the word "car". Unfortunately, there are not many accurate and quick methods for describing a picture. And even if there are for simple pictures (like the picture of a car), they fail for more complex pictures. So, keep in mind that when we design such a method, we usually need to know the specific application. In the example of fingerprints, color information will be disregarded as we have to deal with gray-scale images.

The simplest case - Color histogram

This article is only an introduction to the subject of content-based image retrieval. I will only refer to the simplest method of describing a color image: color histogram. Consider a digital image as a series of pixels. An 800 x 600 image contains 480000 pixels. Each pixel is 24 bits (or 3 bytes), one byte for each of the 3 basic colors: Red, Green, Blue or RGB. So, put it simply each pixel is represented as a mixture of red, green and blue color intensities. Color histogram is a way of describing the color content of a picture. For example, consider the following picture: 


Here we have 4 x 4 = 16 pixels and only 3 colors (red, green, yellow). 8 pixels are yellow, 4 pixels are red and 4 pixels are green. The color histogram depicts the color frequency of an image. In this case, 50% of pixels are yellow, 25% are red and 25% are green:


The reality is a little more complex but that's the idea.

C# - Comparing images using color histogram

I developed a simple C# application to demonstrate the use of color histogram in content-based image retrieval. Here is the graphical user interface:


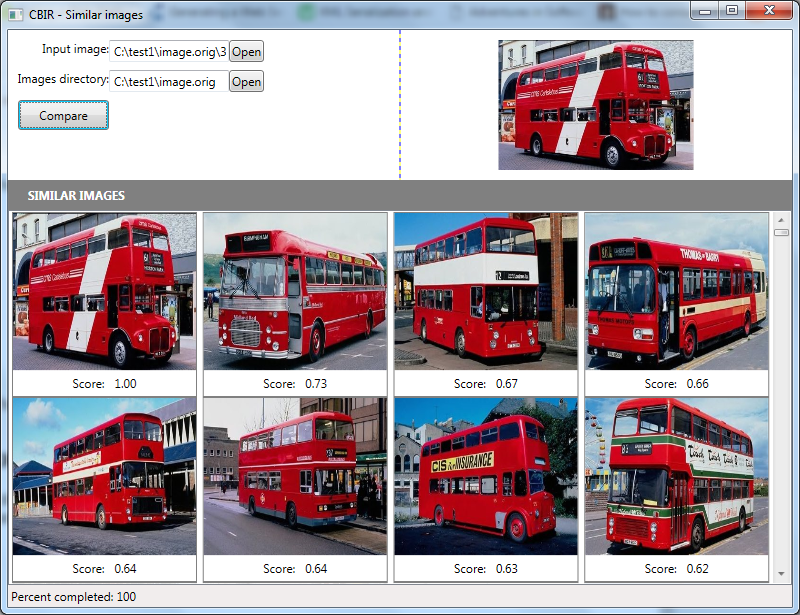
Remember what we need for such an application:
  • An input image: In this case the input image is a red bus.
  • A database to search for similar images: In this case we use the image collection of Wang http://wang.ist.psu.edu/docs/related/. It contains 1000 test images of different categories (buses, animals, sea, sky, people, food etc). 
From the screenshot you can see that even color histogram succeeds in finding a good match. The application calculates and displays the distance between the input image and each image of the test collection. If you could see all the results, you would observe that the 37 most similar images are all buses and mainly the red ones. But from the 38th image, the method of color histogram starts to get confused, just because it is a simple method. And do not forget that the bus is a relatively easy image. The results would be worse for more difficult images. And that is the reason why more accurate and simultaneously more complex methods have been developed for calculating image similarity.

Implementation

The C# implementation was of interest to me because it freshened or improved my WPF, Threading skills. This is the code for calculating the color histogram of an image:

 1
 2
 3
 4
 5
 6
 7
 8
 9
10
11
12
13
14
15
16
17
18
19
20
21
22
23
24
25
26
27
28
29
30
private double[] Histogram1(Bitmap sourceImage)
        {
            double[] RGBColor = new double[512];
            int width = sourceImage.Width, height = sourceImage.Height;
            byte Red, Green, Blue;
            Color pixelColor;

            for (int i = 0, j; i < width; ++i)
            {
                for (j = 0; j < height; ++j)
                {
                    pixelColor = sourceImage.GetPixel(i, j);
                    Red = pixelColor.R;
                    Green = pixelColor.G;
                    Blue = pixelColor.B;

                    int quantColor = ((Red / 32) * 64) + ((Green / 32) * 8) + (Blue / 32);

                    ++RGBColor[quantColor];
                }
            }

            double normalizationFactor = width * height;
            for (int i = 0; i < RGBColor.Length; i++)
            {
                RGBColor[i] = RGBColor[i] / normalizationFactor;
            }

            return RGBColor;
        }

The interesting point here is that the image is reduced to 512 colors, a process known as color quantization. This is important for large image collections, where the image descriptor's size should be small enough to speed-up the comparison process. A descriptor with size 512 (like this color histogram) is considered prohibitive for large collections. So, a descriptor should be smart in order to capture the image information in a small signature (perhaps 10 or 20 numbers totally).

The distance between 2 color histograms is calculated by the Manhattan formula (in essence it is a single difference):

1
2
3
4
for (int i = 0; i < histogram1.Length; i++)
{
   distance += Math.Abs(histogram1[i] - histogram2[i]);
}

Conclusion

Personally, i find the subject of content-based image retrieval very interesting. It is a fertile ground for research. In this article, I showed the simplest application of image retrieval.

Tuesday, 10 May 2016

jQuery DataTables plugin examples

DataTables is a plug-in for the jQuery Javascript library. It adds interaction capabilities to a single HTML table. These capabilities include pagination, instant-search, sorting, row grouping etc. In this tutorial, I share my experiences on this plugin.


Basic usage

DataTables supports 3 basic data sources:
1) DOM (or HTML markup)
2) Ajax (HTML or JSON response)
3) Server-side processing

Let's say we have the following html table:

 1
 2
 3
 4
 5
 6
 7
 8
 9
10
11
12
13
14
15
16
17
18
<table id=”test”>
<thead>
<tr>
<th>column1</th>
<th>column2</th>
</tr>
</thead>
<tbody>
<tr>
<td>data11</td>
<td>data12</td>
</tr>
<tr>
<td>data21</td>
<td>data22</td>
</tr>
</tbody>
</table>

In order to add instant search, pagination and column sorting capabilities we first have to include the jquery.min.js, jquery.dataTables.min.js (along with the corresponding css) libraries. Then we use the dataTables plugin by adding a call to the document.ready function:

1
2
3
$(document).ready(function(){
   $(‘#test’).DataTable();
});

Basic options

You can read the full list of options that DataTables supports in the following link https://www.datatables.net/reference/option/. Some of the basic options which I have personally used are listed in the following table:

Option
Type
Description
Usage
searching
boolean
Enables or disables table searching
searching:true
paging
boolean
Enables or disables table paging
paging:false
sorting
boolean
Enables or disables table columns’ sorting
sorting:false
stateSave
boolean
Controls whether the table state (current page, current search term, current sorting) remains constant on page reload
stateSave:true
pageLength
integer
The number of rows for a single table page
pageLength:10
ajax
url
If an ajax source is being used, the corresponding url is specified by this option
ajax:’loadTable.php’
order
2d-array
Specifies the initial sorting order of the table (if the sorting feature is being used)
order:[[0,’asc’]]
dom
string
Define the table control elements position (for example search field on the top, pages control on the bottom etc.)
'<"top"lf>prt <"bottom"pi><"clear">'
columns
array of objects
Specifies options for every table column (for example the data, the type, the css class of the column or if the column is searchable and sortable)
columns:[{type:’date-uk’}]
columnDefs
array of objects
Along with the columns options, it defines options for the table columns.
"columnDefs": [ {
      "targets": 0,
      "searchable": false
    } ]


Full example with PHP and DOM data source


1) The database
Contact(Id, Surname, Firstname, Company, Phone, Mobile, Email)

2) The php page
“Forgive me for the missing error checking on the part of code that interacts with the database but I want to focus on the DataTables usage.”

 1
 2
 3
 4
 5
 6
 7
 8
 9
10
11
12
13
14
15
16
17
18
19
20
21
22
23
24
25
26
27
28
29
30
31
32
33
34
35
<html>
<head>
<script type="text/javascript" src="jquery.min.js"></script>
<script type="text/javascript" src="jquery.dataTables.min.js"></script>
<link type="text/css" href="jquery.dataTables.min.css"/>
<script type="text/javascript">
$(document).ready(function(){
$('#contacts').DataTable({
                dom: '<"top"lf>prt<"bottom"pi><"clear">',
                order:[[1,'asc']]
});
});
</script>
</head>
<body>
<h2>View contacts</h2>
<table id="contacts">
<thead>
<tr>
   <th>ID</th>
   <th>Surname</th>
   <th>Firstname</th>
   <th>Company</th>
   <th>Mobile</th>
   <th>Email</th>
</tr>
</thead>
<tbody>
<?php
$conn = mysqli_connect("localhost","my_user","my_password","my_db");
$contacts = mysqli_query($conn, "SELECT * FROM Contact;");
while($contact = mysqli_fetch_assoc($contacts)) {
 echo "<tr><td>".$contact['Id']."</td><td>".$contact['Surname']."</td><td>".$contact['Firstname']."</td><td>".$contact['Company']."</td><td>".$contact['Mobile']."</td><td>".$contact['Email']."</td></tr>";
}
?>


Full example with PHP and ajax data source


1) The database
Contact(Id, Surname, Firstname, Company, Phone, Mobile, Email)

2) The php page

 1
 2
 3
 4
 5
 6
 7
 8
 9
10
11
12
13
14
15
16
17
18
19
20
21
22
23
24
25
26
27
28
29
30
31
32
33
34
35
36
37
38
39
40
<html>
<head>
<script type="text/javascript" src="jquery.min.js"></script>
<script type="text/javascript" src="jquery.dataTables.min.js"></script>
<link type="text/css" href="jquery.dataTables.min.css"/>
<script type="text/javascript">
$(document).ready(function(){
$('#contacts').DataTable({
                ajax:'getContacts.php',
                deferRender:true,
                columns:[
                {data:'id'},
                {data:'surname'},
                {data:'firstname'},
                {data:'company'},
                {data:'mobile'},
                {data:'email'}
],
                dom: '<"top"lf>prt<"bottom"pi><"clear">',
                order:[[1,'asc']]
});
});
</script>
</head>
<body>
<h2>View contacts</h2>
<table id="contacts">
<thead>
<tr>
   <th>ID</th>
   <th>Surname</th>
   <th>Firstname</th>
   <th>Company</th>
   <th>Mobile</th>
   <th>Email</th>
</tr>
</thead>
</table>
</body>
</html>

3) The ajax script

 1
 2
 3
 4
 5
 6
 7
 8
 9
10
11
12
13
14
15
16
<?php
$conn = mysqli_connect("localhost","my_user","my_password","my_db");
$results = mysqli_query($conn, "SELECT * FROM Contact;");
$contacts = array(array());
$c = 0;
while($row = mysqli_fetch_assoc($results)) {
   $contacts[$c]['DT_RowId'] = $row['Id'];
   $contacts[$c]['id'] = $row['Id'];
   $contacts[$c]['surname'] = $row['Surname'];
   $contacts[$c]['firstname'] = $row['Firstname'];
   $contacts[$c]['company'] = $row['Company'];
   $contacts[$c]['mobile'] = $row['Mobile'];
   $contacts[$c]['email'] = $row['Email'];
   $c++;
}
?>


Final thoughts

I hope to come back with more examples from the jQuery DataTables plugin. Specifically, my intention is to share my thoughts for server-side processing, column filtering, custom sorting functions (e.g. sort a set of images according to their CSS class), row grouping and speed issues.

Sunday, 15 November 2015

How to convert a matlab structure to xml file

Once a time I wanted to convert a matlab structure into an xml file. I know there are many ready solutions but I wanted one which fit exactly my needs. Let's say that we have a structure Student like this:

Student.Firstname = 'George';
Student.Surname = 'Hames';
Student.Age = 19;
Student.Semester = 'C';
Student.Course1.Grade = 8;
Student.Course2.Grade = 7;
Student.Course3.Grade = 9;
Student.Course4.Grade = 5;

and we want to convert it into this xml file:

<Student>
   <Firstname>George</Firstname>
   <Surname>Hames</Surname>
   <Age>19</Age>
   <Semester>C</Semester>
   <Course1>
      <Grade>8</Grade>
   </Course1>
   <Course2>
      <Grade>7</Grade>
   </Course2>
   <Course3>
      <Grade>9</Grade>
   </Course3>
   <Course4>
      <Grade>5</Grade>
   </Course4>
</Student>

My draft solution is this:

 1
 2
 3
 4
 5
 6
 7
 8
 9
10
11
12
13
14
15
16
17
18
19
20
21
22
23
24
25
26
27
28
29
function xml = struct2xml( s )

sfields = fieldnames(s);

xml = '';
for i=1:length(sfields)
    if isstruct(s.(sfields{i}))
            xml = [xml, strtrim(strcat('<', sfields{i}, '>')), char(10),  strtrim([struct2xml(s.(sfields{i})), strcat('</', sfields{i}, '>')]), char(10)]; 
    else
            fieldValue = s.(sfields{i});
            if (iscell(fieldValue))
                if (size(fieldValue,1)>1), fieldValue = fieldValue'; end;
                fieldValue = strjoin(fieldValue, '#');
            end
            if (isnumeric(fieldValue) && length(fieldValue)>1)
                fieldValueStr = '';
                for j=1:length(fieldValue)
                    fieldValueStr = strcat(fieldValueStr, num2str(fieldValue(j)), '#');
                end
                fieldValue = fieldValueStr(1:length(fieldValueStr)-1);
            end
            if (isnumeric(fieldValue) && length(fieldValue)==1)
                fieldValue = num2str(fieldValue);
            end
            xml = [xml, strcat('<', sfields{i}, '>', char(fieldValue), '</', sfields{i}, '>'), char(10)];
    end
end

end

First of all I have to say that it is not the optimum solution but it works for me. If a field takes multiple values, I use a delimiter (#) to represent them as a string. For example if struct1.field1 = [1 3 40 2] then in the xml we have <struct1><field1>1#3#40#2</field1></struct1>. In order to write the xml string to a file I use the following script:

1
2
3
4
5
6
7
function [] = struct2xmlfile( s, filename )
    xmlStr = struct2xml(s);
    xmlStr = strrep(xmlStr, '%', '%%');
    fid = fopen(filename, 'wt');
    fprintf(fid, xmlStr);
    fclose(fid);
end

Saturday, 5 September 2015

Embed icons in HTML select list

You can embed icons into HTML select lists by using the ddslick (http://designwithpc.com/plugins/ddslick). Let's see a practical example. Suppose that we develop a database of projects. Every project has a progress field which expresses the current status of a project. A project can be active (represented in the database with 1 and in the front-end as a green icon), stopped (represented in the database with 2 and in the front-end as a red icon) and finished (represented in the database with 3 and in the front-end as a checkmark icon). We want to build the following html select list of progress values:


The html code is:

 1
 2
 3
 4
 5
 6
 7
 8
 9
10
11
12
13
14
15
16
17
18
19
20
21
22
23
<html>
<head>
<script type="text/javascript" src="js/jquery.min.js"></script>
<script type="text/javascript" src="js/jquery.ddslick.min.js"></script>
<script type="text/javascript">
$(document).ready(function() {
    $('#progressList').ddslick({ 
        onSelected: function(data) {
            $('#progress').val(data.selectedData.value);
        }
    });
});
</script>
</head>
<body>
<select id="progressList" name="progressList">
    <option value="1" data-imagesrc="images/green.png" data-description="Active project">Green</option>
    <option value="2" data-imagesrc="images/red.png" data-description="Stopped project">Red</option>
    <option value="3" data-imagesrc="images/finished.png" data-description="Completed project">Completed</option>
</select>
<input type="hidden" id="progress" value=""/>
</body>
</html>

As you can see the ddslick plugin adds two extra attributes to the html select list. The first attribute (data-imagesrc) specifies the option icon and the second attribute (data-description) the option description. You have to be careful if you want to post the list's selected value. In this case, you have to use a hidden field and update its value whenever the list's option changes.

Friday, 15 May 2015

Use psexec to execute commands on remote machines

If you want to execute a command on a remote windows system, you can use the psexec utility (https://technet.microsoft.com/en-us/sysinternals/bb897553.aspx). Download PsTools.zip, unzip it on your local hard drive and run the psexec.exe utility by using the following general syntax:
psexec \\computer-name command

Examples

Let's say that the remote machine is named test-pc. You can:
1) Get its ip configuration: psexec \\test-pc ipconfig
2) Get its shared network resources: psexec \\test-pc net view
3) Execute a program that resides on the remote system's local drive: psexec \\test-pc "C:\test\test.exe"
5) Issue any command as you would do on the local computer.

Issues

When a remote command fails to execute you can think of the following possible solutions:
1) Remember that you should have an account with the same credentials (username and password) on the remote machine.
2) Check the command's syntax. Keep in mind that paths with spaces should be enclosed in "".
3) Make sure that you have enabled the default ADMIN$ share on the remote machine.
4) Consider the possible security issues. For example, lets say that you want to change the default gateway of the remote system to 192.168.1.1. You'll need administrator privileges to do this. The psxec utility allows you to specify the username and password with which you want to execute the remote command. So, in this case you should type: psexec \\test-pc -u username -p passwd route change 0.0.0.0 mask 255.255.255.0 192.168.1.1  
 5) Even if you are an administrator on the remote machine the UAC (User Account Control) may block the command execution.Theoritically, the psexec allows you to bypass the UAC prompt by using the -h option, but in my case (Windows 8.1), this does not always work.

For more details, you should study the full documentation of psexec.